
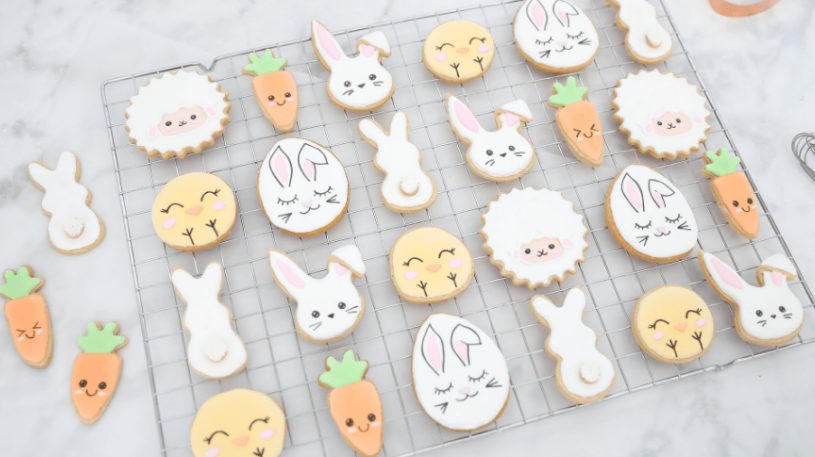
8 Easy Ways To Decorate Sugar Cookies For Easter
Looking for simple and creative ways to decorate your Easter sugar cookies? We’ve got you covered with 8 adorable designs that will take your springtime treats to the next level — without requiring hours of work or advanced decorating skills.
With these easy tips and beginner-friendly techniques, you can create beautifully decorated cookies that look professional enough for Easter baskets, holiday parties, family gatherings, or a special spring celebration.
And to make things even sweeter, we’ve partnered with SPLENDA to bring you a delicious No-Sugar Sugar Cookie recipe that’s simple to prepare, easy to work with, and the perfect canvas for all of your Easter cookie creations.
So grab your cookie cutters, gather the family, and let’s start baking!
PIN this for when you’re ready to make easy and beautiful Easter cookies:
The Cookies
Before decorating comes the most important step — making the cookies!
We love using a lower-sugar cookie recipe because it creates the perfect balance between a delicious sweet treat and plenty of room for creative decorating.
After testing many different sugar cookie recipes, this No-Sugar Sugar Cookie recipe quickly became one of our favorites.
The dough is smooth, easy to roll, and doesn’t stick all over your rolling pin — making it a great recipe for kids to help with. Little hands can join in on rolling the dough, choosing cookie cutters, and creating their own Easter shapes without the frustration of messy dough.
Once baked, these cookies still deliver that classic sugar cookie flavor everyone loves: sweet, buttery, soft, and melt-in-your-mouth delicious.
By replacing traditional sugar with SPLENDA No Calorie Sweetener, Granulated, you can reduce calories while still enjoying a delicious cookie base. It can be used in many recipes where sugar is typically added, making it a convenient alternative for baking.
After choosing your favorite Easter cookie designs, select your cookie cutters and place your cut dough onto a lightly greased baking sheet.
Once the cookies are finished baking, transfer them to a cooling rack and allow them to cool completely before decorating.
While you wait, clear your workspace, prepare your decorating supplies, and make yourself a well-deserved cup of coffee.
We recently discovered SPLENDA Coffee Creamers, which add a rich, creamy flavor to your coffee without adding unnecessary sweetness. French Vanilla is a favorite, but Sweet Cream and Hazelnut are also delicious options.
What You’ll Need For Decorating
Now comes the fun part — turning simple sugar cookies into adorable Easter treats!
All of the designs below use Royal Icing, which creates a smooth, professional-looking finish once dried.
If you’ve never worked with Royal Icing before, don’t worry. It may look intimidating, but every cookie featured here was created by a first-time Royal Icing decorator!
Here are a few helpful tips:
Keep Your Icing Fresh
Once your icing is whipped, cover the bowl with plastic wrap (placing it directly against the icing surface works best) or a damp cloth to prevent it from drying out and forming crusty pieces.
Create Different Colors
Divide your white icing into separate bowls and add food coloring gradually.
Mix well between additions, remembering that dried icing usually appears slightly darker than wet icing. For the best results, make your icing one shade lighter than your desired final color.
Prepare Your Piping Bags
Transfer your finished icing into piping bags with your preferred tips.
Disposable piping bags make cleanup easier, but if you don’t have them, a sturdy zip-top plastic bag works too. Simply snip off one corner and use it as a DIY piping bag.
Don’t Be Afraid To Flood
When decorating sugar cookies, a generous amount of icing helps create a smoother and more even finish.
Easter Cookie Decorating Ideas
Bunny Tails
These adorable bunny tail cookies are one of the easiest designs to start with.
Round cookies work especially well because they are simple to decorate and don’t require detailed piping skills.
Begin by outlining your cookie with Royal Icing, then immediately fill the center with more icing. This helps the edges blend together and creates a smooth finish.
If you notice small gaps, simply use a toothpick to gently guide the icing into place.
For the bunny tail:
- Cover the cookie with white icing
- Add a smaller round cookie near the bottom
- Finish with white pearl candies for extra texture
Don’t have a small cookie cutter? The bottom of a piping tip can work perfectly.
And if Royal Icing feels like too much, regular store-bought white frosting can work too. The goal is to have fun, not make decorating stressful!
Bunny Tails Variation
Using the same technique as the classic Bunny Tails, you can create an adorable bunny backside design by simply changing the cookie shape.
A different cutter can instantly create a whole new look.
Chicks
These little Easter chicks are almost too cute to eat!
Start by covering your cookies with yellow Royal Icing and allow them to dry completely.
Once set, use a black edible marker to draw the chick’s face.
That’s right — no complicated black icing or detailed piping required!
Add small touches of orange for the beak and pink for the cheeks if desired.
They’ll look adorable even with a simple sweet expression.
Carrots
These sweet carrot cookies require a little extra patience because each icing color needs time to set before adding the next layer.
But the finished result is absolutely worth it.
Use different facial expressions with your edible marker to give each carrot its own personality.
Pair them with bunny cookies for an extra fun Easter collection.
Floppy Ear Bunnies
These might be our favorite design!
The floppy ear adds extra charm and dimension, but the technique is surprisingly simple.
Use a bunny face cookie cutter, then gently fold one ear over before baking.
After cooling:
- Cover with white icing
- Allow the icing to set
- Add facial details with an edible black marker
A pink inner ear is optional and can be added once the white icing has dried.
Sleepy Bunnies
These sleepy bunny cookies look impressive but are actually very easy to create.
A simple oval cookie cutter is all you need.
Cover the cookie completely with icing, allow it to dry, and then draw the sleepy face using an edible black marker.
Add pink accents for the ears or cheeks if you’d like.
Invitation-To-Create Cookies
This idea might be the most fun of all!
Instead of decorating the cookies yourself, let your guests or kids become the artists.
Simply:
- Decorate Easter-shaped cookies with white Royal Icing
- Allow the icing to harden
- Add instructions using edible markers
- Provide different colored edible pens for everyone to create their own designs
These make a wonderful Easter activity for kids and are perfect for placing on the children’s table during your holiday gathering.
A craft project they can eat afterward? Yes, please!
Lambs
The lamb cookies are the most detailed design in this collection, but they’re still much easier than many advanced Easter cookie designs.
Start by using a fluted circle cutter to create the lamb’s fluffy wool texture.
After baking and cooling:
- Outline the cookie and face area with icing.
- Fill the wool section with white icing.
- Use an edible marker to sketch the face shape as a guide.
- Once dry, add a flesh-colored icing face.
- Outline the face and ears with white icing.
- Finish with pink details on the ears and cheeks.
Add the final facial details with your edible marker, and your adorable Easter lamb is complete!
Now that your Easter sugar cookies are beautifully decorated, take a moment to enjoy your creations.
Gather the family, share your treats, and celebrate the season with something homemade and memorable.
And don’t forget to enjoy your favorite coffee alongside your cookies — a delicious cup topped with SPLENDA Coffee Creamer makes the perfect finishing touch for your Easter baking day.